
How I Captured the Milky Way at Mount Rainier
Planning the Composition
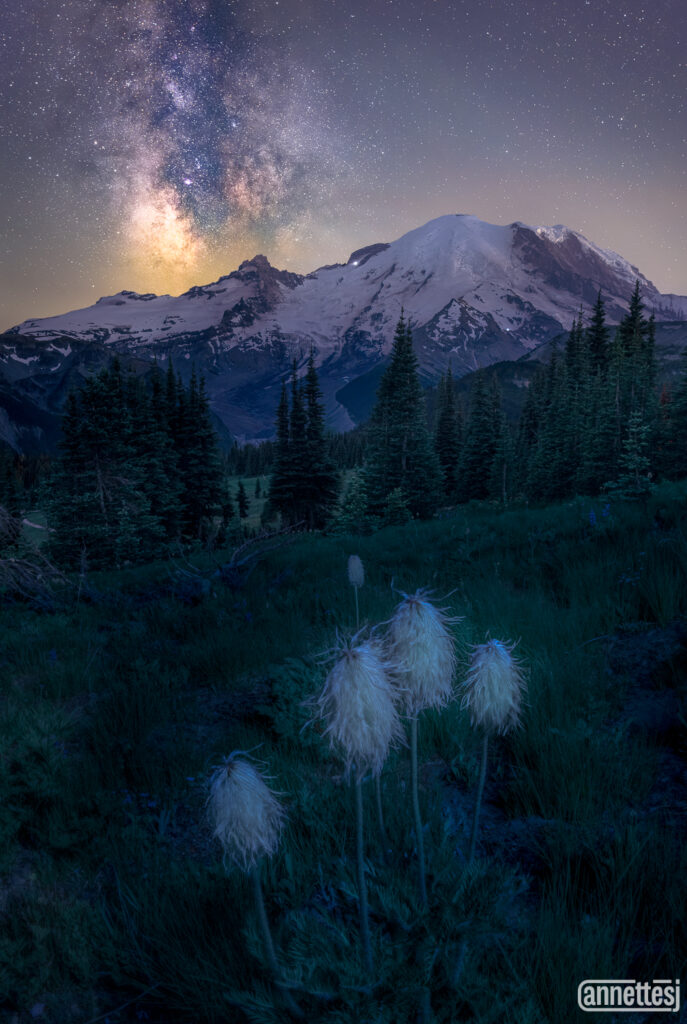
For years, I’d envisioned photographing the Milky Way at Mount Rainier that combined everything I love about Pacific Northwest landscape photography into a single image. My goal wasn’t simply to photograph the Milky Way over the mountain. I wanted a composition with colorful wildflowers filling the foreground, Mount Rainier anchoring the background, and the Milky Way rising through the saddle between the mountain and Little Tahoma. I knew this wasn’t going to be a photograph I could capture with a single exposure. Instead, it would require carefully photographing each element of the scene separately—the flowers, the grass, the mountain, and finally the night sky—before blending them together in Photoshop to create the finished image.
One of the biggest advantages of photographing from Sunrise is that Mount Rainier sits to the southwest, which is exactly where the Milky Way would appear during the middle of the night. With a new moon providing exceptionally dark skies, I knew the galactic core would be visible without competing moonlight washing out the stars. According to my planning, the Milky Way would move into the perfect position behind the mountain at about 2:30 in the morning, giving me several hours to work on every other part of the composition before it was finally time to photograph the sky. That extra time would prove invaluable because I wanted every element of the foreground perfected before the stars reached their ideal alignment.
Rather than arriving after dark and searching for compositions with a headlamp, I came up well before sunset to scout the area while there was still plenty of daylight. This is something I strongly recommend whenever you’re photographing the Milky Way. Finding foregrounds in complete darkness is difficult enough, but trying to evaluate compositions, avoid damaging vegetation, and stay on designated trails becomes much harder once the sun goes down. By arriving early, I could carefully walk the trail, study different foreground options, and use the remaining daylight to determine exactly where the Milky Way would eventually appear relative to Mount Rainier.
My original vision centered around wildflowers. Although the meadows looked full of flowers from a distance, I intentionally limited myself to plants growing immediately adjacent to the trail. Staying on established trails is something I feel strongly about, especially in fragile alpine environments like Mount Rainier. That decision dramatically reduced the number of usable compositions. To make matters even more challenging, the flowers were already a little past their peak bloom, so many patches looked tired or damaged. I spent a considerable amount of time searching for flowers that were still fresh enough to become the main foreground subject. After quite a bit of persistence, I finally found a beautiful clump of pasque flowers growing right along the edge of the trail that perfectly fit the composition I had imagined.
Once I framed the scene, I took several test photographs to evaluate the overall composition. The flowers anchored the foreground, a line of trees filled the midground, Mount Rainier dominated the background, and eventually the Milky Way would stretch overhead. On paper, everything looked exactly the way I had envisioned it. Unfortunately, nature had other plans. Even though the breeze was fairly gentle, the flowers closest to my camera were moving just enough to make sharp photographs nearly impossible. At that point I seriously questioned whether this composition was going to work at all. I considered abandoning it entirely and searching for another foreground.
Instead, I decided to be patient. Since the Milky Way wouldn’t reach its ideal position until around 2:30 a.m., I had plenty of time to wait and see whether the wind would calm down. So I stayed put, bundled up against the cold, watching the flowers sway back and forth in front of my camera. At one point, an insect decided to crawl across the flowers I’d spent so long searching for. Standing there in the dark, cold, and waiting for hours, I couldn’t help but laugh and think maybe this was the universe telling me this photograph simply wasn’t meant to happen. For a brief moment, I honestly considered packing everything up and heading home. Thankfully, the insect eventually fell off the flower on its own, and not long afterward the breeze finally died down. The flowers became still enough to photograph, and suddenly the composition I’d imagined all evening became possible after all.
Photographing the Foreground Flowers
With the composition finally settled and the wind cooperating, it was time to begin photographing the foreground. Even though the Milky Way wouldn’t be in position for several more hours, I wanted to take advantage of the downtime to capture every foreground element while conditions remained calm. My approach for this image was to photograph each part of the scene using the camera settings that worked best for that subject, rather than trying to compromise with a single exposure. The flowers, grass, mountain, and sky would all be photographed separately before being blended together later in Photoshop.
Because the flowers were so close to the camera, focusing them accurately required a completely different approach than focusing on the mountain or the stars. I used my headlamp to illuminate the flowers, giving me enough light to manually focus with precision. Autofocus simply isn’t reliable under these lighting conditions, so manual focus is essential for night photography. As I zoomed in on the image, I realized that even at these close distances I couldn’t keep both the nearest flower and the flowers farther back sharp at the aperture I had originally planned to use. After experimenting, I found that stopping down all the way to f/11 gave me the depth of field I needed to keep all four flowers acceptably sharp in a single image. Even then, I still knew I would need an additional exposure later for the grass just beyond the flowers because it remained outside the plane of focus.
Once I was satisfied with the focus, I switched my attention to exposure. Under a moonless sky the flowers were essentially invisible, so simply taking a long exposure wasn’t enough. Instead, I planned to use light painting to gently illuminate the foreground while the shutter remained open. I started a 30-second exposure and slowly moved my headlamp across the flowers, constantly changing the angle of the light to avoid creating harsh directional shadows. The goal wasn’t to make it obvious that artificial light had been used. Instead, I wanted the flowers to appear naturally illuminated, as though there had simply been enough ambient light to reveal their color and detail.
My first attempt quickly reminded me how subtle light painting needs to be. Looking at the image on the back of the camera, I could immediately tell I had added too much light, making the flowers look unnaturally bright. Rather than accepting a mediocre result, I reduced the intensity of the light painting and repeated the exposure. The second attempt looked significantly better. The flowers were now nicely illuminated without looking artificial, and thanks to the calm conditions, they remained sharp throughout the 30-second exposure. It was a good reminder that light painting usually takes a bit of trial and error. Small adjustments in the amount of light can make a tremendous difference in how believable the final image appears.
With the foreground flowers successfully photographed, I could finally see the image beginning to come together. The patience of waiting for the wind to stop had paid off. The flowers were sharp, the lighting looked natural, and I had the foundation I needed for the final exposure blend. Later, these flower exposures would be blended with separate photographs of the grass, Mount Rainier, and the Milky Way, allowing each element of the scene to be captured using the settings that produced the highest possible image quality. Rather than asking one exposure to do everything, every part of the composition could now contribute its own strengths to the finished photograph.
Photographing Mount Rainier
With the flower exposures complete, I turned my attention to the mountain and the surrounding landscape. Although they would eventually become part of the same final image, the mountain required a completely different set of camera settings than the flowers. The flowers had been photographed at f/11 to maximize depth of field, but for the mountain I wanted to gather as much light as possible. That meant opening the lens all the way to f/2.8 and accepting that the flowers would no longer be in focus. Since I already had sharp foreground exposures, that wasn’t a concern. Each part of the composition could be optimized independently and blended together later.
Focusing at night is one of the biggest challenges in Milky Way photography, especially when you’re photographing a subject several miles away in complete darkness. My starting point was to manually focus on the brightest stars in the sky. By zooming in on the live view display and adjusting the focus ring until the stars became as small and crisp as possible, I could establish a good baseline for the mountain as well. I then switched the camera into Bulb Mode and set up for a four-minute exposure at ISO 400 and f/2.8. The long exposure allowed me to collect enough light from the landscape while keeping the ISO relatively low to help control image noise.
After reviewing the first exposure, I could immediately tell the focus wasn’t quite perfect. It looked reasonably sharp, but I knew there was still room for improvement. Rather than making a large adjustment, I made only a slight movement of the focus ring and repeated the exposure. This is one of the most valuable habits I’ve developed when photographing at night. Instead of assuming the first focus attempt is correct, I make small, deliberate changes, keeping track of approximately where the focus ring was for each image. By comparing the results afterward, I can gradually work my way toward the sharpest possible focus instead of accidentally overshooting it.
My second adjustment brought the mountain into noticeably better focus. The rocky slopes of Mount Rainier and the trees in the foreground looked much sharper, while the flowers nearest the camera naturally remained blurred because they were far outside the depth of field at f/2.8. That was exactly what I expected. Those flowers had already been photographed separately at f/11, so there was no reason to compromise the mountain exposure by stopping down the aperture again. This is one of the biggest advantages of photographing an exposure blend—each exposure can be optimized for the subject it’s intended to capture instead of forcing every element to share the same camera settings.
Once I was satisfied with the focus, I photographed several additional four-minute exposures without changing the composition. Rather than relying on a single image, I planned to stack these exposures together later in Photoshop using a Smart Object and the Median Stack Mode. Long nighttime exposures inevitably contain visible noise, even at relatively low ISO values, and stacking multiple images is an effective way to reduce that noise while preserving fine detail in the landscape. Collecting several identical exposures only took a little extra time in the field, but it would noticeably improve the quality of the final photograph during post-processing.
While the camera quietly worked through each four-minute exposure, there wasn’t much to do except wait. I’d been on location since shortly after sunset, around 9:30 p.m., but the Milky Way wouldn’t reach its planned position until about 2:30 a.m. between Mount Rainier and Little Tahoma. Night photography often involves long stretches of patience punctuated by short periods of activity, and this evening was no different. Instead of rushing, I used that waiting time productively, making sure I had enough foreground exposures and thinking ahead to the sky photographs that would come later. By the time the Milky Way finally aligned with the composition, every other piece of the image would already be complete.
Camera Settings and Gear for Milky Way Photography
With my foreground exposures finished, I still had quite a bit of time before the Milky Way reached the alignment I’d planned. Rather than simply waiting for the next few hours, I thought it would be a good opportunity to walk through some of the camera settings and gear that make my Milky Way workflow more reliable. Night photography can feel intimidating when you’re first getting started, but many of the biggest improvements come from paying attention to a handful of settings before you ever press the shutter.
One of the first settings I always check is Long Exposure Noise Reduction. This feature sounds helpful, but for the type of photography I’m doing here, I actually recommend turning it off. The reason is that after every long exposure, the camera immediately captures a second exposure of equal length with the shutter closed to create a dark frame for noise reduction. If you’ve just spent four minutes photographing the mountain, the camera then spends another four minutes creating that dark frame before you’re allowed to take the next image. Suddenly a four-minute exposure becomes an eight-minute process. When you’re trying to capture multiple foreground images or working within a limited window before the Milky Way moves out of position, those extra minutes disappear very quickly. There are much better ways to reduce noise during post-processing, especially when you’re already planning to stack multiple images.
Manual focus is another setting that becomes absolutely essential after dark. Autofocus simply doesn’t have enough contrast to work with once the sun goes down, so I rely entirely on manual focus for every part of this image. Whether I’m focusing on flowers just inches from the lens, Mount Rainier several miles away, or the stars themselves, manually adjusting the focus ring gives me complete control over exactly where the sharpest point of focus will be. It’s one of those skills that becomes second nature with practice and makes a tremendous difference in consistently capturing sharp night photographs.
Another simple adjustment that many photographers overlook is lowering the brightness of the camera’s rear monitor. A bright LCD screen can quickly destroy your night vision, making it much harder to evaluate the scene around you. Dimming the monitor helps your eyes stay adapted to the darkness and also reduces the amount of stray light affecting anyone else who might be photographing nearby. On this particular evening I had the location mostly to myself, so I didn’t have to worry too much about disturbing other photographers, but it’s always something I try to be mindful of. If you use a headlamp, having one with a red-light mode is another small but worthwhile investment. Red light preserves your night vision much better than white light and is considerably less disruptive to other people working in the area.
With the waiting time continuing, I also gave a quick overview of the equipment I was using for this shoot. My camera was a Sony A7R V paired with a 16–35mm f/2.8 wide-angle lens. A wide-angle lens is ideal for Milky Way photography because it allows you to include both a dramatic foreground and the sweeping night sky within the same composition. Someday I’d love to add an even faster lens—perhaps a f/1.4 or 1.8—but this f/2.8 has served me extremely well and remains one of my favorite lenses for photographing landscapes at night.
One piece of gear I was especially excited to use on this trip was my new Benro tripod. Unlike my previous tripod, this one doesn’t have a center column, which makes it much easier to position the camera extremely close to the ground. For compositions like this, where the flowers are only inches from the front of the lens, that additional flexibility is a huge advantage. Being able to lower the camera without the center column getting in the way opened up compositions that simply weren’t practical with my older tripod.
You may also have noticed the motorized unit mounted between the tripod and the camera. This is a star tracker, a device designed to rotate the camera in sync with the Earth’s rotation. After aligning the tracker with the North Star, it slowly follows the movement of the stars across the sky, allowing for much longer exposures without producing star trails. However, for this video I intentionally focused on the technique I’ve relied on for years—capturing 10 to 15 individual exposures of approximately 10 seconds each and stacking them later in software such as Sequator. It’s a workflow I’m very comfortable teaching because it doesn’t require specialized equipment and consistently produces excellent results. I also wanted to compare both methods under the same conditions to see whether the tracker provided enough improvement to justify the additional setup time and complexity.
Finally, I mentioned two other pieces of gear that make life much easier during long nights in the field. A remote shutter release is essential whenever I’m photographing multi-minute exposures in Bulb Mode, allowing me to trigger the shutter without touching the camera. One important thing to remember is that Bulb Mode won’t work if Silent Shooting is enabled on many Sony cameras, so that’s another setting I always double-check before beginning a long exposure session. I also brought along a lens heater, although I hadn’t needed it yet because temperatures were expected to remain above the dew point. On cold nights, however, a lens heater can save an entire shoot by preventing condensation from forming on the front element of the lens during those long hours under the stars.
Photographing the Milky Way at Mount Rainier
After several hours of photographing the foreground and waiting patiently in the cold, the Milky Way finally began moving into the position I had planned for all evening. Before starting my sequence of sky exposures, I always like to take a few test images to make sure everything is lining up the way I envisioned. Looking at the back of the camera, I could already see the galactic core beginning to appear just to the left of Little Tahoma. It wasn’t quite in its final position yet, but it confirmed that all of the planning I’d done earlier had paid off. Now it was simply a matter of dialing in the camera settings and waiting for the perfect alignment.
For the sky exposures, my goal was to collect as much light as possible while still keeping the stars as sharp points rather than allowing them to trail. I set my shutter speed to 10 seconds, which is generally a good compromise for this focal length and camera combination. The ideal shutter speed depends on your specific camera, lens, and focal length, so I always recommend taking a few test shots and zooming in on the stars, particularly near the corners of the frame, to see whether any noticeable trailing is occurring. PhotoPills also includes an excellent calculator that estimates the longest shutter speed you can use while maintaining reasonably sharp stars. Personally, I tend to push that recommendation just a little longer because I’d rather collect a bit more light and accept a very small amount of trailing that’s virtually invisible at normal viewing sizes.
My lens remained wide open at f/2.8, allowing as much light as possible to reach the sensor. If you have an even faster lens, you can certainly take advantage of that additional light-gathering ability, but f/2.8 works very well for this type of photography. I paired that aperture with ISO 6400, which provides a good balance between capturing enough signal and keeping noise manageable once the images are stacked. Another setting I always check before beginning is white balance. Although white balance can be adjusted later when shooting RAW files, I prefer setting it to around 4000K in the field. It gives me a consistent preview on the camera and keeps my editing workflow more consistent from one Milky Way session to the next.
Rather than manually triggering every exposure, I used the camera’s Interval Shooting mode. I set a two-second delay before the sequence started, programmed an 11-second interval for my 10-second exposures, and instructed the camera to capture 15 consecutive images. That one-second gap between exposures gives the camera just enough time to finish writing each file before starting the next frame. For my workflow, collecting somewhere between 10 and 15 exposures is usually sufficient for stacking later in Sequator, where combining multiple images dramatically reduces the visible noise while preserving detail throughout the Milky Way. It’s a straightforward process that produces excellent results without requiring specialized tracking equipment.
One thing that becomes surprisingly important during long nights of photography is simply becoming familiar with your camera. Working in complete darkness means you can’t rely on reading menu labels or searching for buttons with a flashlight every time you need to make an adjustment. Over time, I’ve learned where the controls are by feel alone, allowing me to change settings, review images, or start an interval sequence without constantly turning on my headlamp. It sounds like a small thing, but becoming comfortable operating your camera in the dark makes night photography significantly less frustrating and helps preserve both your own night vision and that of anyone photographing nearby.
As the night became colder, I noticed another familiar problem beginning to develop: condensation. Although I hadn’t expected to need it, the temperature dropped enough that moisture started collecting on the front of the lens. At that point I installed my lens heater, connecting it to an external battery pack to gently warm the lens and prevent additional condensation from forming. It was actually one of the coldest Milky Way photography sessions I’ve experienced, and this ended up being the first real opportunity to put this particular lens heater to the test. Fortunately, it worked exactly as intended and allowed me to continue photographing without worrying about moisture ruining the remaining exposures.
After completing the sequence, I zoomed in to inspect the results. The stars looked nicely defined, with only the slightest hint of elongation near the extreme corners of the frame. At this magnification it’s easy to become overly critical, but once viewed at normal size the stars appeared essentially sharp. For me, this represents the sweet spot between maximizing image quality and collecting enough light. Reducing the shutter speed to eight seconds would certainly reduce the tiny amount of trailing even further, but with an f/2.8 lens it also means sacrificing valuable light and increasing visible noise. I’d rather gather a little more signal and let the stacking process clean up the noise afterward than produce technically perfect stars at the expense of overall image quality. After taking a few additional sky sequences in slightly different positions, I was confident I had everything I needed to move on to the final experiment of the night—comparing these stacked images with exposures captured using the star tracker.
Comparing Image Stacking and a Star Tracker
One of the reasons I was excited about this trip was the opportunity to compare two different approaches to photographing the Milky Way. For years, my standard workflow has been to capture a series of relatively short exposures—typically 10 to 15 images around 10 seconds each—and stack them together later in Sequator to reduce noise. More recently, I added a star tracker to my gear, and I wanted to see how the results compared under the same conditions. Since I had already captured everything I needed using my usual workflow, I decided to stay a little longer and photograph the scene again using the tracker.
A star tracker is designed to compensate for the Earth’s rotation by slowly moving the camera at the same rate as the stars. After properly aligning the tracker with the North Star, you can leave the shutter open much longer than you normally could without producing star trails. In theory, this allows you to collect significantly more light in a single exposure while keeping the stars perfectly sharp. It’s an impressive piece of technology and one I’ve been looking forward to experimenting with. However, like any tool, it also introduces its own set of challenges.
Unfortunately, this particular location highlighted one of the biggest limitations of using a tracker. To achieve accurate tracking, the system needs a clear view of the North Star for polar alignment. Behind my shooting position was a stand of trees that partially blocked that view, making it difficult to align the tracker as precisely as I would have liked. Even a small alignment error becomes noticeable during long exposures, especially toward the edges of the frame. There are ways to align the tracker without a clear view of the North Star, but I had not prepared for that possibility. Typically those methods are just needed for southern hemisphere milky way shooting.
After reviewing the tracker images, I found exactly what I had been worried about. While the center of the frame looked reasonably good, the stars near the corners showed visible trailing caused by the imperfect alignment. The tracker itself wasn’t the problem—it was simply the reality of trying to use one in a location where the North Star wasn’t fully visible. Had I been photographing from an open location with an unobstructed northern horizon, I’m confident the results would have been much better. But this experience reinforced an important lesson: the effectiveness of a star tracker depends heavily on your shooting location and your ability to perform an accurate polar alignment.
What really stood out to me was how dependable my traditional stacking workflow proved to be. By photographing 10 to 15 exposures at 10 seconds each and stacking them later in Sequator, I was able to create a clean, low-noise image without needing perfect polar alignment or additional setup in the field. The process is straightforward, works almost anywhere, and is far more forgiving when obstacles prevent using a tracker effectively. That’s one of the reasons I chose to focus this video on the stacking method rather than the tracker. It’s the technique I’m most familiar with, it’s easier to explain, and it’s a workflow that many photographers can use immediately without purchasing additional equipment.
That doesn’t mean I’ve given up on using a tracker. Quite the opposite. I think both techniques deserve a place in every night photographer’s toolbox. There will undoubtedly be situations where a tracker offers a significant advantage, particularly under open skies where accurate polar alignment is easy to achieve. But there will also be nights like this one, where terrain, trees, or other obstacles make a tracker difficult or impractical to use. Having both workflows available gives me the flexibility to adapt to whatever conditions I encounter in the field rather than relying on a single solution for every situation.
Bringing the Final Image Together
After spending the entire evening—and well into the early morning—capturing each individual component of the scene, it was finally time to bring everything together. While the finished photograph appears to be a single image captured in one moment, it is actually the result of several carefully planned exposures, each photographed with settings optimized for a specific part of the composition. Rather than compromising on depth of field, image noise, or overall sharpness, photographing the flowers, grass, mountain, and sky separately allowed every element to be captured under the conditions that suited it best. The extra work in the field ultimately gave me far more flexibility during post-processing and resulted in a significantly higher-quality final image.
The foreground flowers formed the foundation of the composition. These were photographed as a single 38-second exposure while being gently illuminated with light painting. Because the flowers were only inches from the front of the lens, I stopped the aperture down to f/11, which allowed me to keep all four flowers acceptably sharp within the frame. Even at that aperture, however, the grass immediately behind the flowers still fell outside the depth of field, so I photographed an additional exposure with the focus moved slightly farther back to capture that portion of the scene in sharp focus as well. Those two images would later be blended together to create a foreground that appeared naturally sharp from front to back.
Next came the mountain. Rather than relying on a single long exposure, I photographed four separate four-minute exposures of Mount Rainier and the surrounding trees. By stacking these images together later in Photoshop, I was able to reduce noise while preserving fine detail throughout the landscape. Shooting multiple exposures takes more time in the field, but it’s one of the simplest ways to improve image quality in low-light conditions without resorting to excessively high ISO values. Since the flowers had already been photographed separately, I was free to use the aperture and focus settings that produced the sharpest possible mountain rather than trying to satisfy both foreground and background with one compromise exposure.
The sky completed the final piece of the puzzle. For the Milky Way, I captured a stack of ten exposures, each lasting 10 seconds at f/2.8, all photographed from exactly the same camera position at 18mm. Stacking these shorter exposures allowed me to reduce image noise substantially while maintaining pinpoint stars and preserving the intricate detail within the galactic core. Although I experimented with a star tracker later in the evening, the stacked 10-second exposures ultimately produced the image I chose to use because they delivered the cleanest and most reliable result under the conditions I encountered that night.
My post-processing workflow followed the same philosophy as my work in the field: each element was optimized individually before being combined into the finished photograph. I began by processing the sky images in Sequator, using its stacking capabilities to reduce noise while preserving the detail of the Milky Way. I then made my initial adjustments to all exposures in Lightroom, where I performed basic tonal and color corrections. Finally, I brought every component—the flowers, grass, mountain, and stacked sky—into Photoshop, where I blended them together into the final image you see here. Because every exposure had been carefully planned from the beginning, assembling the final exposure blend became less about fixing problems and more about allowing each element to contribute its strengths to the finished photograph.
You may have noticed, at no point do I call this a composite image. Composite image is a very vague term. It could mean someone took a photo Mount Rainier Monday, took a sunset photo in Arizona on Tuesday, and then put that sky behind Mount Rainier. Or, maybe a sunset sky that isn’t even their own photo. By contrast, I call this an EXPOSURE BLEND because all photos were taken from the same location, same camera, same focal length, without moving the camera AT ALL. It represents a real moment in time. This is the Milky Way at Mount Rainier as it was on a cold July night in 2026.
Looking back on the evening, this image serves as a reminder that successful landscape photography is often built on patience as much as technical knowledge. I spent hours scouting compositions, waiting for the wind to stop, refining focus, experimenting with different techniques, and simply allowing the night to unfold. There were moments when I questioned whether the photograph was even going to happen, yet those challenges ultimately became part of the story behind the image. That’s one of the things I enjoy most about photographing the night sky. The final photograph is only part of the experience. The planning, the problem-solving, and the quiet hours spent under a sky full of stars are every bit as rewarding as the image itself. I hope this behind-the-scenes look at my workflow gives you ideas you can apply to your own Milky Way photography, whether you’re just getting started or refining techniques you’ve already been using for years.
Milky Way at Mount Rainier Photography
If you’d like to see more Milky Way photos, including more photos of the Milky Way at Mount Rainier, be sure to check out my Astrophotography Gallery. If you’d like to see more beautiful landscape photos of Mount Rainier, please check out my Mount Rainier Gallery.