
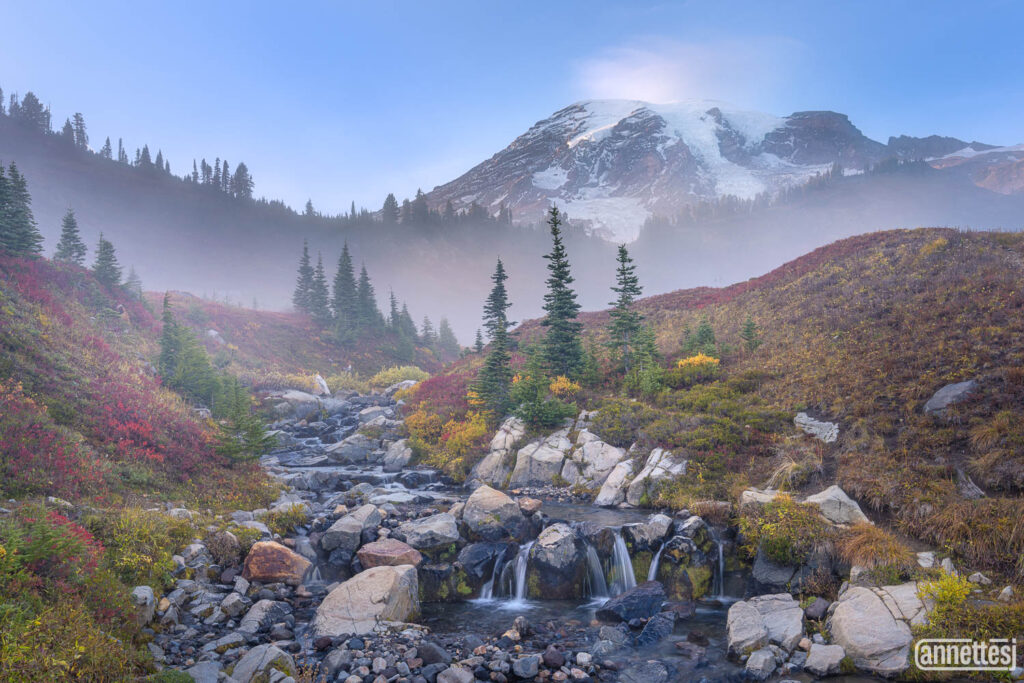
Fall photography at Mount Rainier can change in a matter of minutes. One moment you have a clear view of the mountain, and the next you can be standing completely inside a cloud. That unpredictability is part of what makes photographing the mountains in fall both challenging and rewarding.
The colors around the Paradise area of Mount Rainier National Park were peaking at the end of September, with beautiful yellows and reds filling the meadows. Red huckleberry covered the landscape, and many of the same plants that had been filled with wildflowers just a few months earlier had transformed into vibrant fall foliage. But fall is also a season of transition in the weather. Clouds can move in quickly, light can disappear, and a composition that looked perfect a few minutes ago may suddenly be gone. On this particular outing, that happened over and over again.
The day became a good reminder of why I like to plan several possible compositions before I arrive, keep my camera set up so I can react quickly, and remain flexible about what I photograph when conditions don’t go according to plan. Those three things made a huge difference on this outing because the scene changed repeatedly from the time we arrived until sunset.
When Mount Rainier Disappears Into the Clouds
When we were driving toward Paradise, the weather looked extremely promising. The sky was crystal clear, with only a few low clouds hugging Mount Rainier. By the time we had been walking around and exploring for a while, though, more and more clouds had moved in. Eventually, the mountain disappeared completely.
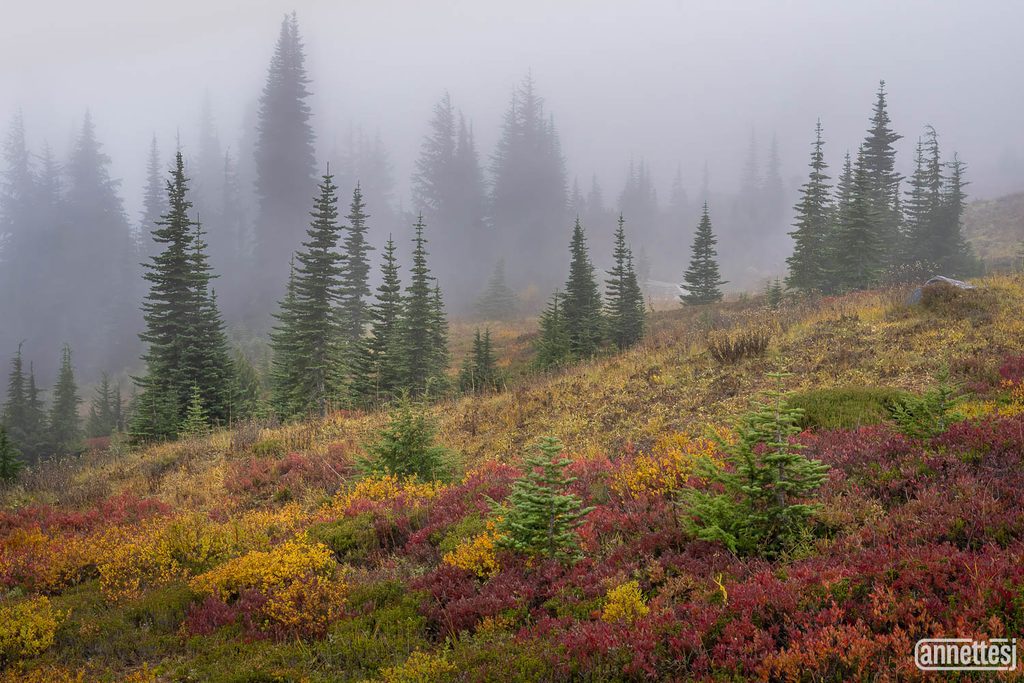
A few minutes earlier, we had also been able to see the Tatoosh Range from the area where we were photographing, but that disappeared too. Before long, we were basically standing inside a cloud. Instead of the wide mountain views I had originally envisioned, the scene in front of me became a much more intimate landscape with beautiful fall foliage in the foreground, evergreens scattered through the meadow, and low mist drifting through the trees.
Even without the mountain peaks, it was still a beautiful scene. This is one of the biggest lessons I have learned from photographing landscapes in changing weather. If the scene you planned for disappears, don’t immediately assume the photography is over. Start looking around, because sometimes the clouds that hide the dramatic mountain view create an entirely different type of photograph nearby.
In this case, the mist simplified the landscape and created layers among the trees that probably would not have been nearly as interesting under clear skies. Instead of concentrating on a single dramatic subject, I started paying more attention to smaller relationships within the landscape, including the foliage, trees, haze, and the way the layers receded into the background.
Setting Up My Camera for Rapidly Changing Conditions
When conditions are changing quickly, I don’t always want to be tied to my tripod. There are certainly times when a tripod is the best tool for the photograph, and later in this outing I absolutely needed one, but when I’m exploring a scene and moving rapidly between compositions, being able to handhold my camera gives me much more flexibility.
One thing that helps me do that is a saved camera preset on my Sony. My camera has memory positions on the mode dial where I can save groups of settings, and I use one of those positions for what I think of as my “run-and-gun” landscape photography setup. My starting point for that preset is 1/200 second, f/8, Auto ISO, low-speed continuous burst, and back-button focus.
I originally chose 1/200 second because I wanted a shutter speed that would be reasonably safe for hand holding if I had my 70-200mm lens attached. From there, I can adjust the settings depending on the lens I’m actually using and what is happening in the scene. The important part is that I don’t have to start from scratch. If the light suddenly changes or I see a composition that may only last for a short time, I can turn the dial to that memory setting and immediately have a usable starting point.
That can make a surprisingly big difference in rapidly changing mountain weather, because sometimes the best light only lasts for a minute or two. Having a setup ready to go means I can spend that time making the photograph instead of digging through settings.
Adjusting Shutter Speed, Aperture and ISO in the Field
For the first foggy compositions, I was using my 50mm lens, so I didn’t necessarily need the full 1/200-second shutter speed from my preset. I could slow the shutter speed down and use that extra light to help keep my ISO lower. At one point, I was around f/8 and ISO 800. ISO 800 wasn’t terrible, but I wanted to see whether I could open the aperture slightly and still keep enough of the scene in focus.
I focused roughly a third of the way into the scene and was able to bring the ISO down to around 400. After looking at the results, though, I thought the wider aperture had left some parts of the photograph a little too soft, so I adjusted again. I narrowed the aperture to around f/10 and used a shutter speed of approximately 1/50 second. That pushed the ISO to around 500, but that was a compromise I was comfortable making.
One of the things I think photographers sometimes worry about unnecessarily is getting every landscape photograph at ISO 100. Of course, if the subject isn’t moving and you’re using a tripod, a low ISO is generally the better choice. But when you’re hand holding and trying to stay mobile, there is nothing inherently wrong with increasing the ISO when the situation calls for it.
Modern noise-reduction tools are also extremely good. I regularly use Lightroom Denoise and Topaz to clean up noise when necessary, and as long as the photograph is exposed well and the important detail is there, a moderate increase in ISO can often be handled very effectively later. In this situation, I’d rather have a sharp photograph at ISO 500 or ISO 800 than introduce motion blur because I was too determined to keep the ISO low.
Why I Use Burst Mode When Hand holding Landscapes
Another part of my saved handheld setup is low-speed burst mode. I use back-button focus to establish focus, then when I press the shutter, the camera captures several photographs in succession. This gives me a little extra insurance when I’m shooting at slower shutter speeds.
Even when you think you’re holding the camera perfectly still, there can be tiny movements from one frame to the next. One photograph may have a slight amount of motion blur while the next is perfectly sharp. Taking a short burst gives me several frames to compare later and increases the odds that one of them will be tack sharp.
I don’t use this because I want hundreds of nearly identical photographs. It’s simply another way to improve my odds when I’m working handheld in conditions where I want to stay flexible and move quickly. For rapidly changing scenes like this, that flexibility is often worth much more to me than being locked into one tripod position.
Photographing Foggy Trees and Fall Color
I spent several minutes working the meadow and experimenting with different compositions of the foggy trees and fall color. I photographed both horizontal and vertical compositions and also tried narrowing in on smaller sections of the landscape rather than attempting to include everything.
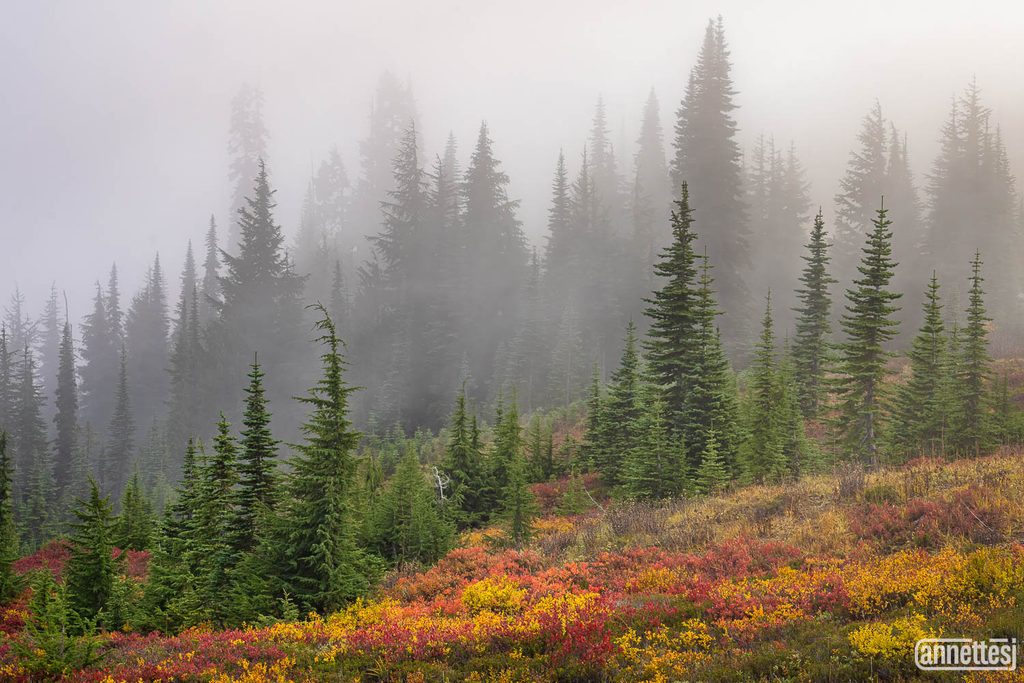
One of my favorite images from this part of the outing has several distinct layers. In the foreground, there are a couple of small trees surrounded by colorful fall foliage. Behind them is another stand of trees in the midground, and farther back, the mist partially obscures another group of trees until they almost look like ghosts. That progression from a clear foreground to increasingly hazy layers in the background gives the photograph a strong sense of depth.
I also liked the way the ground moved diagonally through the frame. Instead of the landscape feeling completely static, that angle helps guide the eye farther into the scene. These kinds of details become especially important when the big dramatic subject you expected to photograph is no longer visible.
Without Mount Rainier or the Tatoosh Range in the frame, I started paying much more attention to the relationships between the foliage, trees, mist, and shapes within the landscape. The weather had taken away one composition, but it had given me another, and in some ways it forced me to look more carefully at the scene in front of me.
Staying Flexible Instead of Automatically Reaching for the Tripod
There was some noise in these handheld photographs, especially in the frames photographed around ISO 800, but the difference between ISO 400 and ISO 800 wasn’t nearly as dramatic as someone might expect. Topaz was able to remove the visible noise very easily, and I added a small amount of sharpening at the same time.
Again, if I were photographing a completely static subject and had plenty of time, the ideal solution for maximum image quality would be to use a tripod, lower the ISO, and extend the shutter speed. But that wasn’t really the point of what I was doing here. I wanted to stay nimble, because conditions were changing quickly and I wanted to be able to move from one composition to another without repeatedly setting up and repositioning a tripod.
There is a balance between achieving technically perfect settings and actually being ready to make the photograph. For these foggy fall scenes, staying handheld gave me the freedom to explore the area, react to subtle changes in the mist, and work several different compositions before the weather changed again.
For another composition, I switched to a longer focal length so I could isolate a smaller section of the trees. With the longer lens, I increased the shutter speed to reduce the chance of motion blur and used a tighter aperture to help keep the important layers of the scene in focus. Once again, the photograph was built around those layers, with vibrant fall color in the foreground, a defined group of trees in the middle, and misty trees gradually disappearing into the background.
At that point, I thought the mountain photography portion of the evening might be over. As it turned out, the weather had one more surprise waiting for us.
When Mount Rainier Finally Reappeared
Just when I thought we had probably seen the last mountain peak of the day, the weather changed again. The clouds began to lift, and suddenly Mount Rainier started to appear. After spending so much of the evening photographing foggy trees and intimate fall scenes, it was exciting to realize that we might actually get a completely different type of photograph before sunset.
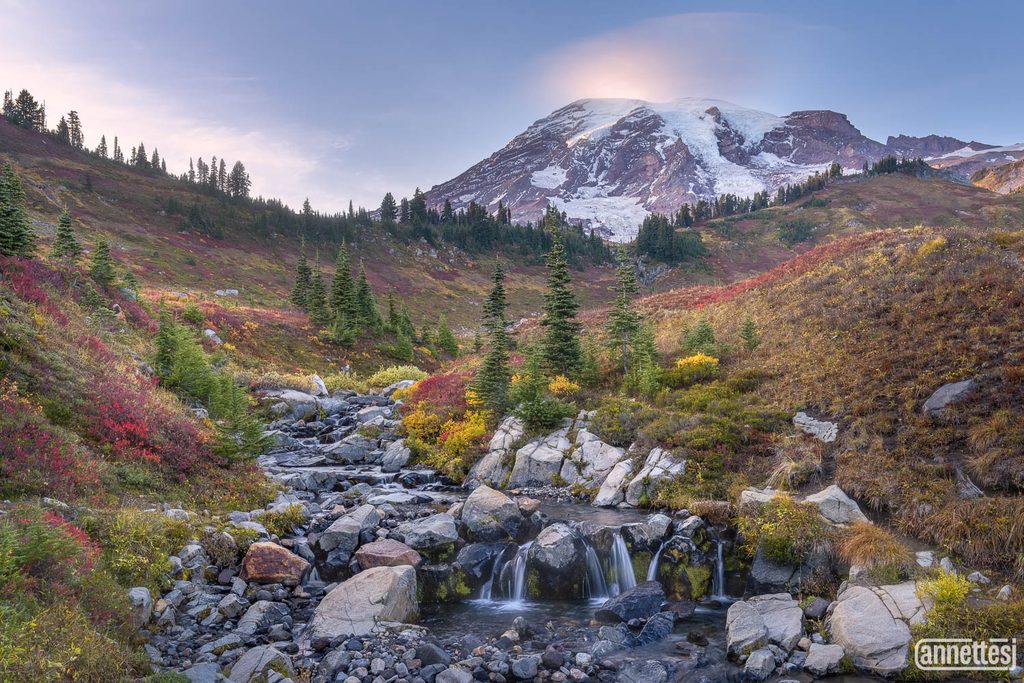
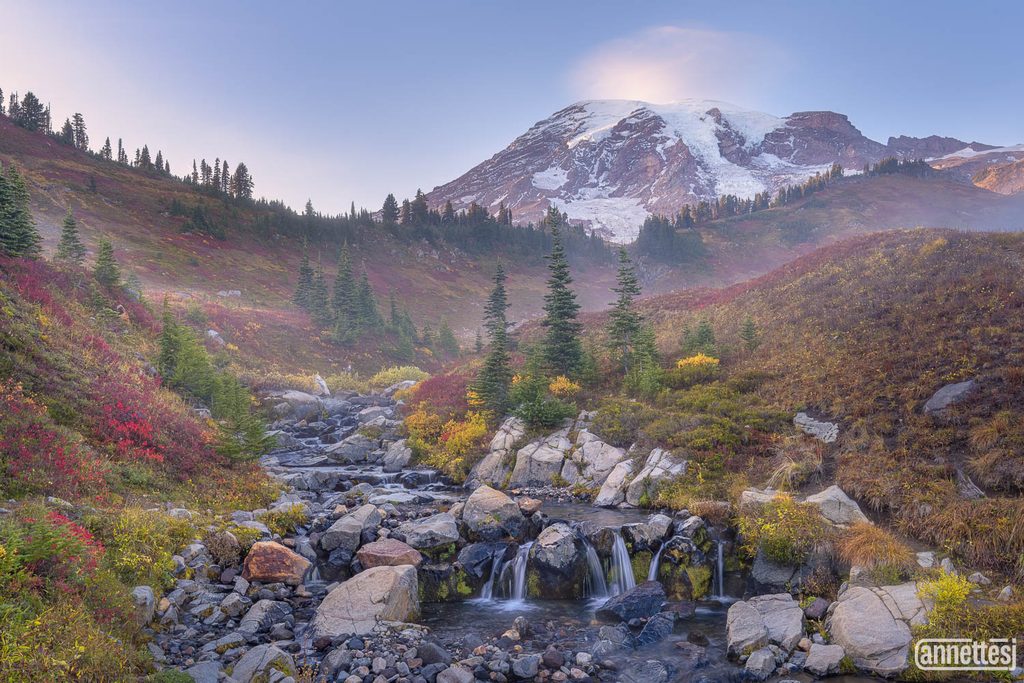
We already had a composition lined up nearby with a small waterfall in the foreground and Mount Rainier in the distance. As the clouds lifted, there was still enough fog and mist around the mountain to keep the scene interesting, and we were beginning to get some beautiful golden-hour light as the sun moved lower. At that point, the priority was simply to work quickly and capture as much as possible before the conditions changed again.
This was a perfect example of why it helps to know more than one composition in the same area. I didn’t have to hike somewhere else, scout a new location, or figure out where to stand after the mountain suddenly appeared. I already knew where I wanted to photograph it, and the composition was only a short distance from where I had been working with the foggy trees.
Knowing When It Is Time to Use the Tripod
For the foggy tree photographs, staying handheld had helped me move quickly and remain flexible. This new composition was different, and this was the point where I absolutely wanted the tripod.
There were two main reasons. First, I wanted to show movement in the little waterfall in the foreground, which required a longer exposure. Second, I was photographing almost directly toward the sun. That created a scene with a very large difference between the brightness of the sky and the darker foreground, so I wanted to make separate exposures that I could blend later.
For the foreground exposure, I focused on the waterfall and used a shutter speed of about one-third of a second. That was long enough to give the water some movement while still retaining some texture rather than turning it into a completely smooth white blur. Once I had that exposure, I focused on the mountain and tightened the shutter speed so I could protect the brighter highlights in the sky and on the mountain.
This is one of those situations where having a tripod gives you much more control than trying to do everything handheld. I could keep the composition exactly the same while changing focus and exposure, knowing that the resulting files would line up properly when I blended them later.
Blending Exposures for a High Dynamic Range Scene
The first photograph in the series was made just after the clouds had begun to lift and Mount Rainier first became visible. For the final image, I blended two exposures. One was a one-third-second exposure for the waterfall and foreground, while the other was approximately one-eighth of a second for the sky.
The shorter exposure helped keep the brighter part of the scene under control so I didn’t lose highlight detail. I later blended the two files in Photoshop, selecting the portions of each exposure that worked best for the final image. You could also combine exposures like these using Lightroom’s HDR function, but I generally prefer Photoshop because I have more control over exactly which parts of each photograph are included in the blend.
Exposure blending can be especially useful in mountain landscapes near sunrise or sunset, when the sky and mountain may be receiving beautiful light while the foreground is already becoming much darker. Rather than compromising one part of the scene to correctly expose another, I can capture the information I need in separate files and combine them afterward.
Watching the Scene Change From One Photograph to the Next
What I especially enjoyed about this part of the evening was how much the scene continued to change while I was standing in essentially the same place. The first photograph still had quite a bit of cloud around the mountain. As I continued shooting, the clouds lifted farther, leaving just a little mist clinging to the valley while more sunset light reached the mountain and remaining clouds.
By the final photograph in the sequence, the clouds had almost completely cleared. There was only a touch of cloud near the top of Mount Rainier, and the entire mountain was visible. We were losing light quickly by then, so I had to raise my ISO somewhat for the foreground exposure, but that was preferable to losing the shot as the sun disappeared.
I still have a hard time deciding which version I like best. The heavier clouds add drama and atmosphere. The middle version has a nice balance between mist and a clearly visible mountain. The final version gives the cleanest view of Mount Rainier. They are all photographs of essentially the same composition, but the changing weather gives each one a very different feeling.
That is another reason I try not to leave a good landscape composition too quickly when the conditions are evolving. Sometimes photographers get the shot they originally envisioned and immediately move on. When clouds, light, fog, or weather are changing, it can be worth staying in place and continuing to photograph the scene. A few minutes later, you may have an entirely different image.
Planning Multiple Compositions Before I Arrive
By the end of the evening, we had essentially gotten two completely different photography sessions in one outing. First we photographed foggy fall color and trees with the mountains completely hidden. Then the clouds opened and gave us Mount Rainier, a waterfall, fall color, mist, and sunset light.
One thing that helped make that possible was knowing in advance that there were multiple compositions very close to each other. The foggy tree location and the waterfall composition were only a short distance apart, so I could respond to whichever conditions were working best without spending precious time moving to a completely different part of the park.
I had found these areas before the trip by looking at trip reports on AllTrails. One feature I find particularly helpful for photography scouting is being able to see photographs other users have taken along a trail. The map shows where those images were made if the person had geotagging turned on, so you can get a much better sense of what different areas along the route actually look like.
When I am planning a photography outing, I am not necessarily looking for someone else’s exact composition to copy. I am trying to understand what subjects are available in the area, where certain views might open up, how far apart possible locations are, and whether there are several different types of photographs I could make within a relatively small area.
That kind of planning becomes particularly useful when the weather is unpredictable. If one planned composition isn’t working because the mountain is covered by clouds, I already have some idea of what else might be available nearby. Then if the conditions change again, I can move back to the mountain composition without losing much time.
The Photograph I Didn’t Take
There was also one very useful lesson from a photograph I didn’t get.
Earlier in the evening, the Tatoosh Range had been visible behind the meadow where I was photographing the foggy trees. That was actually part of the composition I originally had in mind. I was moving around, looking for the best place to line up the meadow in the foreground with the mountains in the background, and somewhere in the process I was changing a lens or adjusting my setup.
Then the fog rolled in.
The Tatoosh Range disappeared before I took the photograph. I was busy taking b-roll for YouTube!
My friend was ready and got the shot. Hers looked great. I didn’t get mine.
It was a very good reminder that when you have the light or the conditions you want, take the photograph first. You can refine the composition afterward. You can experiment with another lens afterward. You can look for something even better afterward. But especially in the mountains, you shouldn’t assume that the scene in front of you will still be there five minutes later.
That doesn’t mean rushing every photograph. It means recognizing when something is temporary. If the light is changing quickly or clouds are moving across a mountain, I would rather get a strong version of the photograph immediately and then continue refining it than spend too much time trying to perfect everything before I press the shutter for the first time.
Be Ready When the Conditions Change
This outing ended up being a much better photography session than I expected during that period when Mount Rainier had completely disappeared. It would have been very easy to look at the clouds, decide the mountain photography wasn’t going to happen, and leave.
Instead, the fog gave us another subject to work with. We photographed the fall foliage and layered trees while the mountains were hidden, and then the clouds began to part at exactly the right time for us to photograph Mount Rainier at sunset.
That experience reinforced several things I try to keep in mind when photographing fall landscapes. Have your camera set up so you can start shooting quickly. Know a few possible compositions in the area before you arrive. Look around when the scene you planned for isn’t working. Decide whether staying handheld or using a tripod makes the most sense for the photograph in front of you. Most importantly, when the conditions are there, take the shot.
Fall is a season of transition, not only in the colors but also in the weather. Clouds can be unpredictable, particularly in the mountains, and a scene with beautiful light may disappear in a matter of minutes. But the opposite can happen too. A mountain that has been hidden for most of the evening can suddenly appear just before sunset.
Sometimes the best thing you can do is simply stay prepared and give the weather a chance to change.
Don’t Give Up Too Soon
If there is one final lesson I would take away from this evening at Mount Rainier, it is not to give up too soon.
When the clouds first moved in, I didn’t think we were going to see the mountain again. If we had treated that as the end of the outing, we would have missed the entire sunset sequence. Instead, we found something worthwhile to photograph in the conditions we had and stayed open to whatever happened next.
That is one of the things I enjoy most about landscape photography. Planning matters enormously, but planning isn’t the same thing as controlling what happens. You can research a location, scout possible compositions, understand where the light will be, and prepare your camera carefully, but the landscape still gets the final say.
The goal is to arrive prepared enough that when something unexpected happens, you can take advantage of it.
On this particular evening at Paradise, that meant being ready for foggy trees when the mountain disappeared and being ready for Mount Rainier when it unexpectedly returned. Two very different sets of conditions gave me two very different kinds of photographs, all within the same small area and the same evening.
For fall photography at Mount Rainier, I can’t think of a much better reminder that changing conditions aren’t always something to work around. Sometimes they are what make the outing memorable.
I hope you enjoyed this week’s blog! If you’d like to stay up to date on my latest posts, join my newsletter.
More Fall and Mount Rainier Photography
If you’re planning your own fall photography outings, you may also enjoy my guide to fall photography in Washington, where I share more locations and techniques I’ve used throughout the state.
You can also explore my Mount Rainier Photography Collection and Autumn Landscape Collection to see more photographs created during changing mountain light and fall conditions.
If you’d like individualized help with planning, composition, camera settings, or editing, I also offer one-on-one landscape photography coaching.