Photographing Columbia River Gorge Waterfalls on Windy Spring Days
Spring is one of my favorite times of year to photograph waterfalls in the Columbia River Gorge. The waterfalls are flowing strong from snowmelt and rain, the moss is incredibly vibrant, and the forests take on that deep green Pacific Northwest look that makes the area so photogenic and a favorite destination for Pacific Northwest Photography. In this week’s adventure, I spent two days photographing waterfalls throughout the Gorge while dealing with one of the biggest challenges for long exposure waterfall photography: wind. While overcast weather creates beautiful soft light for waterfalls, windy conditions can create a completely different problem by causing leaves and foliage to blur during long exposures. In this blog, I wanted to walk through not only the locations I photographed, but also the techniques I used to create clean, natural-looking waterfall images despite the challenging conditions.
Waterfall Photography in the Columbia River Gorge
When I first arrived in the Columbia River Gorge, the conditions looked promising right away. The skies were fully overcast with soft cloud cover, which is exactly the kind of weather I hope for when photographing waterfalls. Bright sunny conditions can create extremely harsh contrast on waterfalls, especially when parts of the scene are in shadow while others are lit directly by sunlight. Overcast weather softens the entire scene and allows the textures in the rocks, moss, and moving water to really stand out without distracting bright highlights. It had also started raining lightly, which is incredibly common when photographing waterfalls in the Pacific Northwest. As much as photographers sometimes complain about rain, it often creates the best conditions for waterfall photography because it deepens the colors in the rocks and foliage while adding atmosphere to the scene. Since I knew the weather could continue changing throughout the day, I had my rain cover ready for the camera while scouting compositions along the trail.
Scouting Compositions for Waterfall Photography
Before setting up my tripod, I spent quite a bit of time simply walking around and looking at different compositions. One of the most important parts of landscape photography is slowing down and evaluating how elements in the scene work together. I eventually settled on a composition that featured small streams and rivulets of water cascading over rocks in the foreground while leading the viewer deeper into the scene toward the waterfall in the background. I really liked how the moving water naturally guided your eye through the frame and created depth throughout the composition. One thing I often look for when photographing waterfalls is a balance between foreground interest and background structure. In this case, the foreground water added motion and texture while the layered cascades and moss-covered rocks in the background helped create a sense of scale and atmosphere. I knew right away this composition had strong potential once the exposures were blended together.

Camera Settings for Long Exposure Waterfall Photography
Once I finalized the composition, I switched my camera into manual mode and dialed in the settings I typically use for waterfall photography. For this scene, I chose a shutter speed around 1/4 of a second. In my experience, shutter speeds between about 1/4 second and 1/2 second often create the most natural-looking water movement. Longer shutter speeds can sometimes blur the water too much and remove all of the texture, while shorter exposures may not show enough movement. I also used a narrow aperture around f/14 to maximize depth of field and help keep both the foreground and background in focus. My ISO was adjusted only as needed to balance the exposure while maintaining image quality. One other important tool I used throughout the trip was a circular polarizer filter, often called a CPL. Waterfalls involve a huge amount of wet rocks and reflective surfaces, and a CPL filter helps reduce those reflections dramatically. By rotating the filter, I was able to remove distracting glare from the rocks and water while enhancing the richness of the greens and the texture throughout the scene. The difference with and without the CPL was substantial and it’s one of the most important filters I carry when photographing waterfalls.
Why Wind Creates Problems for Waterfall Photography
As I continued photographing the scene, I noticed a light breeze moving through the trees and surrounding foliage. This is where photographing waterfalls becomes more complicated than many people realize. The shutter speed needed to create beautiful flowing water also records movement in leaves, branches, and plants. Even a subtle breeze can turn otherwise sharp foliage into distracting blurry patches throughout the image. This becomes especially noticeable in forest environments like the Columbia River Gorge where leaves and ferns are such an important part of the composition. Rather than accepting blurry foliage as unavoidable, I decided to capture additional exposures specifically designed to freeze the motion of the leaves. This is one of the techniques I use most often when photographing waterfalls in windy conditions because it allows me to preserve both the movement of the water and the detail in the surrounding forest.
Blending Multiple Exposures to Freeze Leaves
To solve the problem, I photographed two separate exposures of the exact same composition. The first exposure used a longer shutter speed around 1/4 second to create the silky movement in the water. The second exposure used a faster shutter speed around 1/15 of a second to freeze the motion in the leaves and foliage. Later in Photoshop, I blended these exposures together to combine the best parts of both images. Exposure blending is an incredibly useful technique in landscape photography because conditions in nature often involve competing technical requirements that cannot be solved with a single frame. In this case, the blended image preserved the soft flowing water while keeping the surrounding forest crisp and natural-looking. One of my favorite compositions from the trip ended up being a horizontal image where the foreground water leads beautifully through vibrant green moss-covered rocks deeper into the scene. The exposure blending technique made a huge difference in the final result and helped maintain a much cleaner overall image.
Unexpected Changes in the Gorge After Wildfires
Interestingly, the composition I originally intended to photograph that day ended up not being my favorite image. I had initially planned to spend more time photographing Emerald Falls, but the area has changed significantly following recent wildfires in the Columbia River Gorge. Wildfires have had a major impact throughout parts of the Gorge over the last several years, and many locations now look very different than older photographs online. Some areas have lost large sections of forest while others have changed due to falling trees, erosion, or trail closures. It was a really good reminder that landscape photography often requires adapting to current conditions rather than expecting locations to look exactly like reference photos. Whenever I travel to photograph waterfalls or mountain landscapes, I always recommend checking recent trip reports and current images from hikers or photographers. Nature changes constantly, and understanding current conditions can help avoid disappointment and allow you to plan compositions more effectively.
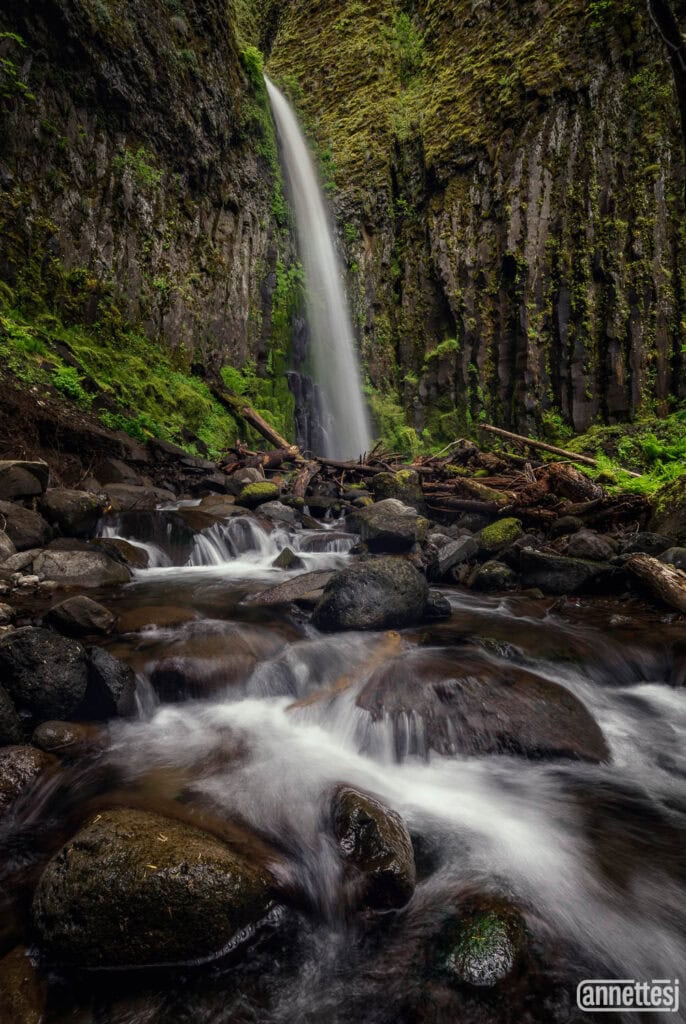
Waterfall Photography Dry Creek Falls
The following day, we visited Dry Creek Falls, which is located only a short drive from Emerald Falls. This waterfall immediately stood out to me because of the dramatic cliffs surrounding the falls and the beautiful stream flowing through the foreground. Right away, I knew I wanted to create a low-to-the-ground composition that emphasized the movement of the water flowing toward the camera. There were also a number of downed logs in the midground, and lowering the camera angle helped minimize their visual impact while placing more emphasis on the cliffs, waterfall, and foreground water patterns. I always enjoy trying different perspectives when photographing waterfalls because even small changes in camera height can dramatically change the balance of elements within the scene. In this composition, the foreground rivulets became one of the strongest parts of the image and helped create a much stronger sense of depth leading toward the waterfall in the distance.
Focus Stacking for Maximum Sharpness
For the Dry Creek Falls composition, I once again used a shutter speed around 1/4 second along with a narrow aperture around f/16. However, because the closest rocks were extremely near the camera while the waterfall was much farther away, depth of field alone would not be enough to keep everything sharp. To solve this problem, I used focus stacking. Focus stacking involves taking multiple exposures focused at different distances throughout the scene and later blending them together in post-processing. I started by focusing on the closest foreground rocks using a small spot autofocus area and then gradually moved the focus point deeper into the scene with each additional exposure. As the focus moves farther from the camera and approaches the hyperfocal distance, fewer additional exposures are needed, but I generally prefer taking more frames than I think I’ll need just to be safe. Missing a section that falls out of focus can be extremely frustrating later during editing, so having extra focus stack frames provides much more flexibility during processing.
Returning to Exposure Blending at Dry Creek Falls
Just like the previous day, wind continued moving through the trees and surrounding foliage while I photographed Dry Creek Falls. Because of that, I once again captured a faster exposure around 1/15 second specifically to freeze the leaves while maintaining the longer exposure for the water movement. After blending the images together in Photoshop, the final result became one of my favorite waterfall photographs I’ve ever captured. Images like this are one reason I love creating waterfall photography prints, where the texture of the moving water and rich greens of the Pacific Northwest can really come to life as large wall art.I really love how the flowing water leads the eye through the foreground while the towering cliffs naturally frame the waterfall in the distance. The combination of soft overcast light, vibrant moss-covered rock walls, and flowing water created exactly the kind of Pacific Northwest atmosphere I love most about photographing waterfalls in the Columbia River Gorge.
Comparing Different Shutter Speeds
While photographing Dry Creek Falls, I also spent time experimenting with different shutter speeds to compare how they affected the look and feel of the water. In one image, I used a shutter speed around 1/4 second, while another image used a slightly longer exposure around 1/2 second. Even relatively small changes in shutter speed can dramatically affect the texture of moving water. Shorter exposures preserve more detail and energy in the water, while longer exposures create a smoother and more ethereal look. Personally, I often prefer the balance created around 1/4 second because it still shows movement while retaining some texture and structure within the water itself. Experimenting with different shutter speeds is something I highly recommend because there is no single “correct” setting for waterfall photography. The ideal look often depends on the speed of the water, the surrounding environment, and the artistic mood you want to create.

1/4 second

1/2 second
Tips for Better Waterfall Photography
One final tip I wanted to share from this trip is to bring water socks or waterproof footwear when photographing waterfalls. Some of the best compositions often require stepping partially into streams or positioning the tripod directly in moving water. Being able to safely move around the stream can open up a huge variety of creative foreground compositions that simply aren’t possible from the shore. Of course, safety should always come first when working around waterfalls and moving water. Wet rocks can be extremely slippery, currents can be deceptively strong, and conditions can change quickly. Always move carefully, protect your gear from spray and rain, and evaluate your surroundings before stepping into the water.
Final Thoughts
This trip was a great reminder that some of the best landscape photography opportunities happen when conditions are less than perfect. Windy weather created additional technical challenges, but it also pushed me to use exposure blending techniques that ultimately improved the final images. The Columbia River Gorge remains one of my favorite locations for Pacific Northwest photography and waterfall photography, especially during spring when the waterfalls are flowing strong and the forests are glowing vibrant green. If you enjoy photographing waterfalls, I highly encourage experimenting with multiple exposures, focus stacking, and different shutter speeds to better adapt to changing conditions in the field. Landscape photography is often about problem-solving just as much as it is about composition, and learning how to adapt to the environment is one of the most rewarding parts of the process.
Many of the images from trips like this eventually become part of my waterfall collections, featuring some of the most beautiful waterfalls throughout Washington and Oregon. To see more beautiful waterfalls of the Pacific Northwest and browse my collection of waterfall photography prints, check out my Waterfall Gallery.
Want to Learn More?
If you want to take this further, I offer one-on-one landscape photography coaching where we can work through these techniques together, including how to approach scenes in the field, how to capture images for focus stacking and exposure blending, and how to process them in Lightroom and Photoshop to create natural, polished results. Learn more here: Landscape Photography Coaching.